
On-line since 2002
> 600
pages
> 1150 manufacturers
> 11000
pictures
> 1.000.000 unique visitors
![]()
![]()
![]()
![]()
![]()
![]()
![]()
![]()
![]()
![]()
![]()
![]()
![]()
![]()
![]()
![]()
![]()
87thScale.info does not
spam. If you received a
spam message with an 87thScale return mail
address it is forged.

Building an RMM resin kit
Text & pictures are © 2002 / 2003 Todd Terpstra
As it used to be the case with me, many modelers shy away from making certain models if the kit comes in a substance other than plastic, and can't be glued with a tube of Testors glue. This little clinic is intended to take some of this fear away, so you can enjoy a vehicle in your collection or on your layout that otherwise wouldn't have been there because of what you think is the limitation of your skill. In no way does my appearing here indicate that I am an expert! Quite simply, I want you to enjoy as much of this hobby as I do and if I can help to promote your purchase and building of a resin kit, the manufacturer of that resin kit may produce another equally interesting kit with that interest, thereby benefiting us all.
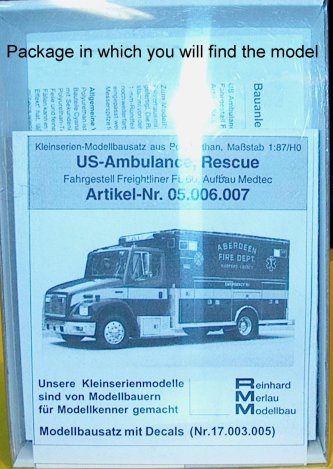
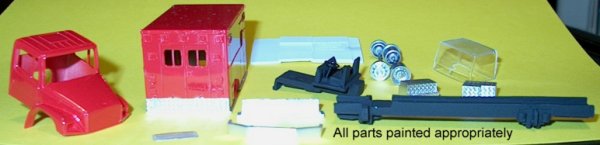
The kit which is focused upon here is RMM’s "US-Ambulance, Rescue" Artikel-Nr.05.006.007. This is a resin kit of a Freightliner ambulance typical of many seen in use with suburban and rural fire departments in North America. It is a beautiful little kit with excellent mould quality and fit and finish are the easiest I have encountered with a resin kit yet. Prices for this kit range from $40.00 to $65.00 US and the kit is available from a couple of different retailers. It is composed of 23 individual parts including Herpa beverage truck type tires (low profile) and wheels, the ambulance body, underframe, cab, cab "glass" insert, rear step bumper, frame tool boxes/steps, interior (seats and dash, separate Herpa-type truck steering wheel), front bumper, ambulance body floor, a "lightbar" moulded in some sort of clear soft polyresin and a beautiful stainless steel photoetched grille.
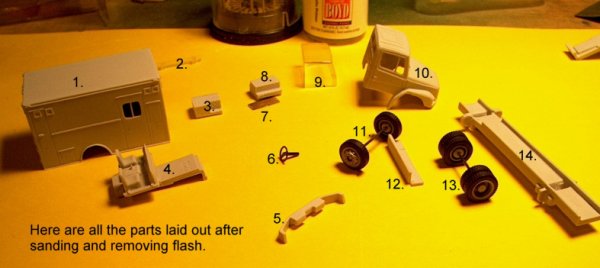
Upon opening the box, you will find the kit in raw resin moulded form. Some parts, such as the front and rear bumpers and the frame mounted tool boxes are still set in mould flash and must be removed and sanded down to correct thickness. This was the first thing I did. After removing the flash and sanding these parts, I then dry fitted (dry fitting is testing the overall fit before gluing) the cab, frame, ambulance body, front and rear bumpers. I found some warpage in the body of one of the kits, but nothing serious enough to compromise fit and when I dry fitted the floor of this body, it pushed out the warpage. I also found heavier flash on the driver’s side bottom of the ambulance body on both kits, this was sanded to even out. The cab on one of the kits also had a significant amount of mold release goo on the upper passenger side door frame, but we’ll get to this later. The cab hood on one of the units had some slight blemishes that needed some sanding and possible filling, but after sanding, I decided to leave it until the first coat of primer, which would show whether more attention would be necessary. One of the rear step bumpers had a bubble hole near the front where it attached to the body, and was hidden when dry fit, so I decided to leave this alone as well. Bubbling does occur with resin moulds , but the holes left by a mould bubble can easily be filled and sanded before priming. No other filling or sanding was necessary before priming, so I got out the primer and thinned for airbrushing. I prefer Boyd’s primer for this scale, because the grain is so fine, that "orange peeling" does not occur when applying final paint coats. It's slightly more expensive than Testors regular primer, but to me its worth it. I also make mention of "dry fitting" quite often in this article. With a kit of this nature (i.e. resin), it is essential that you dry fit as often as you can, to ensure that all components will fit properly when you finally commit to glueing. Resin is an entirely different material than plastic, its more brittle and should be handled gingerly and without excess pressure, especially in large, weaker parts such as the body, cab and frame. If you do break a part, don’t panic! Anything can be repaired with cyanoacrylate, but remember that part will not have the same strength as it did before the repair.
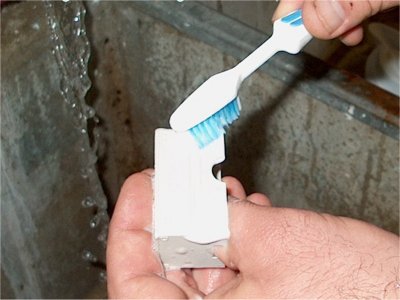 After all parts are sanded and dry fitted to your
satisfaction, bring everything to the sink, lay out a soft, clean towel and mix
a little laundry detergent with some warm water in a small cup. Dip a
soft-bristle toothbrush (use a cheap new one if you can) in the solution and
begin gently scrubbing all the parts from the kit-inside and out. Resin kits
have mold-release agents and other secretions that MUST be removed in this
fashion. You’ll see why later. There are many suggestions as to what one could
use to clean resin parts, but I’ve always used a laundry detergent without any
problems. I usually scrub once, rinse thoroughly, gently pat dry with a soft
towel and let the parts air dry for an hour or so, and then scrub again and
rinse thoroughly for good measure. The mould release goo I mentioned earlier on
the cab of one of the kits came free and cleaned up nicely after the first
scrubbing.
After all parts are sanded and dry fitted to your
satisfaction, bring everything to the sink, lay out a soft, clean towel and mix
a little laundry detergent with some warm water in a small cup. Dip a
soft-bristle toothbrush (use a cheap new one if you can) in the solution and
begin gently scrubbing all the parts from the kit-inside and out. Resin kits
have mold-release agents and other secretions that MUST be removed in this
fashion. You’ll see why later. There are many suggestions as to what one could
use to clean resin parts, but I’ve always used a laundry detergent without any
problems. I usually scrub once, rinse thoroughly, gently pat dry with a soft
towel and let the parts air dry for an hour or so, and then scrub again and
rinse thoroughly for good measure. The mould release goo I mentioned earlier on
the cab of one of the kits came free and cleaned up nicely after the first
scrubbing.
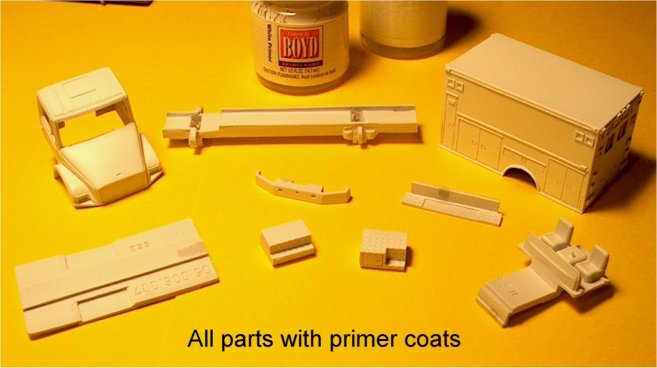
Once your parts have dried completely (give at least a good two hour drying time at room temp.), inspect the parts one more time for blemishes or secretions and prepare for primer. Priming is a must for resin kits as this will provide a good base for the paint coats to adhere, and priming will reveal surface blemishes that the naked eye may not catch with initial inspections. After one light coat of primer, I once again inspected for blemishes and found a slight mould variance in the door of one of the cabs and the hood blemish on the other didn’t go away, so out came the sand paper again. After light wet sanding from 400 to 600 grit sandpaper (make sure if you wet sand over primed areas, that these areas are cleaned off with a damp cloth and allowed to dry), the parts were ready for a second coat of primer. The second coat was a little heavier and went on smoothly, showing clean cab and body parts. No more sanding, Yeah!
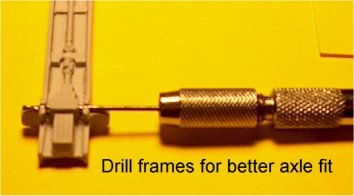
One more dry fit for insurance showed the axle holes in the frame were restricting the axles. I figured with paint added, the holes would be even more restricted, so I found a drill bit slightly larger than the axles and drilled out the axle holes in the frame. ( I like moving wheels!)
Next came painting. I chose Humbrol #19 gloss red. It’s a rich red with fine texture and dries smooth and hard as diamonds. I do recommend using Humbrol thinner to thin Humbrol paint for airbrushing, it makes cleanup far easier and the paint seems to flow better. The first airbrushed coat went on nicely with no surprises. After drying 6 hours, the second coat was ready to go on. It too went on beautifully (God bless the English for their fine hobby paint) and after another 12 hours of dry time, inspection showed a flawless paint surface. I decided to let the parts set for another 24 hours for good measure and then prepare masking off for the chrome paint on the body. The primed bumper, toolboxes/steps, wheels and rear step bumper were set aside and inspected one last time before painting.
When masking the body, it becomes apparent that the first few steps in the process of building this model are very important. With a scrubbed clean surface accepting 2 coats of primer without any bleed through of mold release agents, one can be fairly confident that your 2 beautiful coats of paint will not come off with the masking tape! I masked the body parts with regular 3M masking tape (nothing special, but has worked for all my projects-just enough tack and flexibility) leaving the front lower body, (diamond plate) lower running panel and rear lower body (diamond plate) exposed for the Testors chrome trim. I airbrushed the exposed body parts and the other parts set aside with the chrome trim. I immediately removed the mask, careful not to touch the freshly painted areas. Voila! No paint came off with the mask. I then let the "chromed" parts dry overnight.
More dry-fitting and everything fit well. Next I airbrushed the frame and interior shell with Testor’s flat black. These parts painted well and one more dry-fit showed good fit yet.
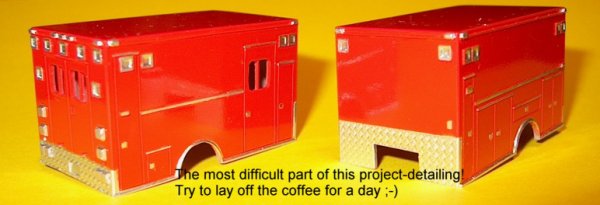
I then set aside some clear "glass" from the packaging material and cut it into size for the side and rear windows in the body (about 1/8" / 0,3 mm larger around the window frame so the cyanoacrylate could be applied with minimal crazing) and prepared to airbrush some acrylic Tamiya smoke paint to the body windows for tint. I used three coats of paint for a fairly dark finish as the interior of the ambulance body was not detailed. These were set aside to dry and preparations were made to work on the FUN stuff – that’s right – detail painting. I layed off coffee for the day and returned to the project with a steady hand to brush the chrome paint on the body side moldings, door slam locks, door upper trim, light bezels, running light frames, taillights and headlights on the cabs. I then hand brushed flat black on the grille indentation on the cab (so much better looking with a black background to that beautiful grille) and the interior of the cab, following up with Testors black chrome trim on the cab door handles, hood pull, window frames and wiper/vent indentation on the cabs. After the chrome detail paint had dried sufficiently, Tamiya clear red and clear orange were applied in the appropriate light bezels and tail lights. The clear or "white" lights were given a couple applications of Microscale Krystal Klear as well as the cab headlights.
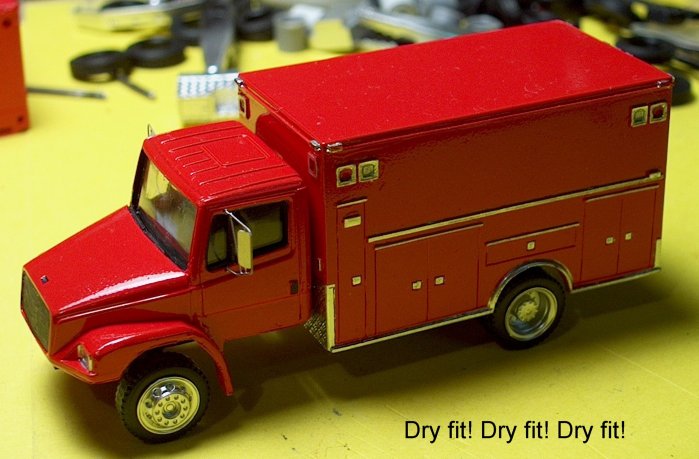
Finally we get to assemble this beauty. More dry-fitting with all the parts showed a little warpage on one of the interior tubs which extends all the way to the front of the frame. I did manage to coax the tub into the frame, but was afraid the cab might rest unevenly on the tub. After checking the cab fit with the warped tub, I was convinced I could hold the cab evenly in place while the quick-set super glue was setting up without compromising the fit of the bumper and ambulance body, so I proceeded with assembly. Sparingly applying the cyanoacrylate with a toothpick, the interior tub was glued first. Then came the tinted "glass", the floor of the ambulance body and the rear step bumper. All assembled well and another dry fit to the frame showed good fit. The cab "glass" was left loose in the cab and the cab was glued to the tub insert next. Without the luxury of alignment pins and snap tight fit, you should dry fit parts before gluing to see where the contact points are first, then apply the glue sparingly (this allows for a second chance to re-fit the part if something goes wrong with final fit). The cab with the warped interior tub fit too lopsided for my taste, so I popped off the cab and interior tub from the frame to file down parts of the tub for proper fit. (when breaking off a previous glue point-take extreme care to notice any stress fractures in the paint-it usually signifies that the part could fracture with more stress. Make sure you clean up the hardened cyanoacrylate as best you can for a good, clean fit the second time) After this was done, and the tub and cab reattached, the fit and alignment was much better, especially where the bumper meets the cab fascia. With the cab in place, the front bumper was glued on followed by the tool boxes/steps to the frame. Make sure the toolbox/steps do not extend beyond the rear of the cab, or the body will not fit properly. Now the ambulance body is ready to be attached to the frame. This is where all the dry-fitting pays off. Both bodies went into place nicely on both frames with proper space left from the cabs and the rear of the frames.
Again, check contact points with dry-fitting so your glue is placed in the best possible place without excess. Finally, the grille was glued to the indentation in the cab. Use cyanoacrylate sparingly here (only on the top and bottom edges) or the stainless steel will discolor. Some discoloration will appear even with small amounts of glue, but can be polished off with a damp cloth. You may even wish to use a dab of epoxy on the edges instead of cyanoacrylate to avoid discoloration. I chose to add a pair of A-Line #50153 tractor mirrors and per instructions, drilled appropriate holes for these and glued them with cyanoacrylate to the cab door frames. Much more detailing could be done, such as adding fender mounted turn signals and installing Lonestar marker light frames filled with Tamiya clear red paint (for emergency lighting) in the grille and and on the sides of the hood, but I decided enough was enough for now. On a final assembly note; the corny soft clear polyresin thingy RMM added for a lightbar is too soft and pliable for a serious attempt at copying the real McCoy, so I discarded them and have not yet decided what I will use for the lightbar on the body. Maybe something bashed from the Busch lightbar collection.
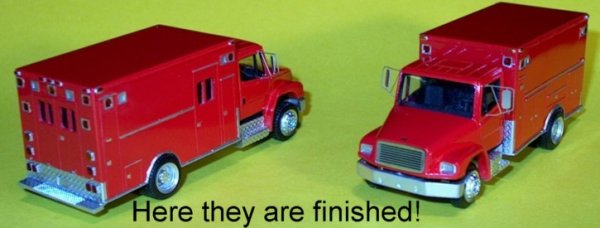
I hope this has been helpful to you in your collecting and modeling efforts. Who knows, maybe you’ve been thinking about trying your hand at a resin kit. If you have, I would recommend this kit as it is the easiest resin kit I’ve built to date. It's expensive as even resin kits go, but for the almost guaranteed fit and finish, it’s fairly easy for a beginner, and makes a great addition to an emergency vehicle collection or a layout.
Todd Terpstra