
On-line since 2002
> 600
pages
> 1150 manufacturers
> 11000
pictures
> 1.000.000 unique visitors
![]()
![]()
![]()
![]()
![]()
![]()
![]()
![]()
![]()
![]()
![]()
![]()
![]()
![]()
![]()
![]()
![]()
87thScale.info does not
spam. If you received a
spam message with an 87thScale return mail
address it is forged.

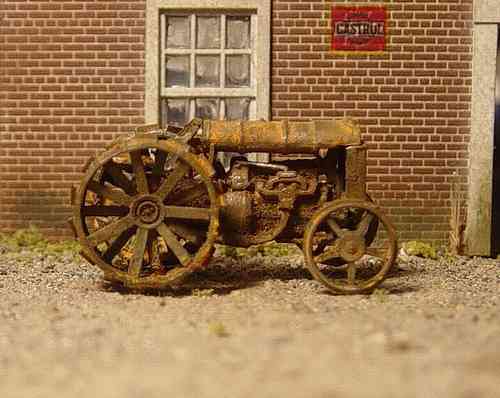
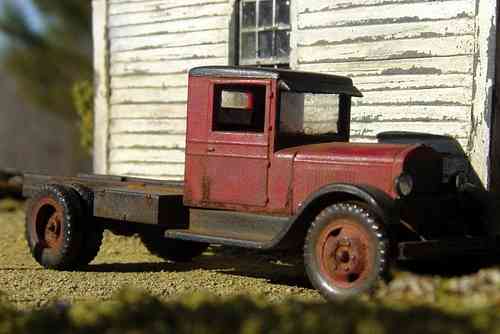
Weathered / worn metal
A 'tutorial' by Chester Fesmire
All pictures are © Chester Fesmire
I've been asked to try my hand at a tutorial and thought I'd give it a whirl.
I’ve recently read an article on weathering that made an interesting point. In trying to do a tutorial, one must be fairly specific about the subject or one tends to gloss over important little things in order to keep moving along and hopefully maintain the interest of the viewers. Thereby, the teaching becomes vague and somewhat confusing.
So in an effort to make things as clear as possible, I decided to tackle only one small aspect of the big weathering picture at a time. I’d like to try to explain how I get the look of weathered metal. Now since all metal isn’t necessarily outside and collecting rust and that rust alone comes in so many different varieties, weathered metal alone could cover several volumes. Actually if you get a few basics down with metal, you can go from there to get all kinds of looks. One thing I try to keep in mind when weathering anything is that less is more. You can usually always add more to what you want to do but removing it can be a discouraging effort. And most first attempts at weathering tend to be overdone.
I start by taking all metal that is going to show wear and/or weather and give it a coat of Polyscale
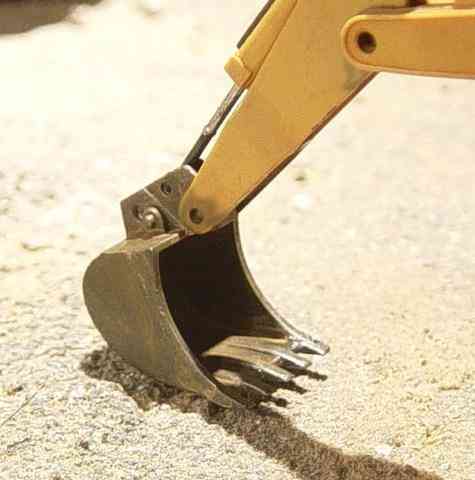
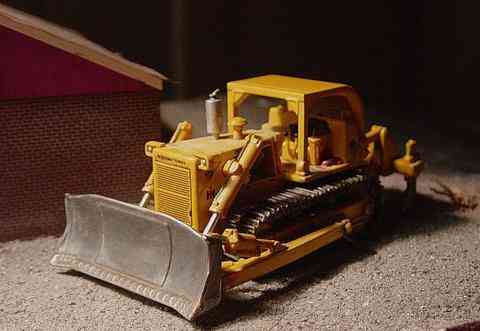
'grimy black' acrylic paint which is no more than a dark grey and being an acrylic, dries fast. Take a look at the old handsaw hanging in the garage, if it isn’t rusted or well used it’s probably a shade of dark grey. So let’s look at a well used old saw, or bulldozer blade or hook on the end of a cable. Anything that would have wear would be showing some freshly exposed metal.
I use a product that can be had in most hardware stores or decoration centers called 'Rub N’ Buff' in silver leaf (#76370K). This product is like a paste almost and I use a #2 sable brush that I have cut the bristles to less than 1/8”. Pretty drastic, but what I’m going to do is dry brush the high spots and outside corners of the piece with the silver paste. This product is fairly forgiving in that if you streak too much on, it can be buffed off with a clean cloth or Q-tip. It takes some doing so don’t go willy-nilly all over, try to do your dry brushing lightly only putting on what should look like just a hint of bare metal showing and only where wear would be (And if we were weathering kitchen utensils we would say: where wares wear). This dry brushing of silver can be done anywhere a metal object shows wear even when the paint finish is still very much intact and not rusted away like on the edges of a hood or trunk or running board edges and around door handles.
Now for the fun part. Even a dozer blade collects what I call night rust on it even if it is used daily. So I have made a concoction of iron oxide powder (rust but very fine like a pastel chalk powder) mixed into a container filled with 10 parts denatured alcohol and about 1 part 2lb cut of shellac. To that I put in a gob (accurate measurements now) of yellow ochre acrylic artists color. Obviously, start with a small amount of the acrylic color and add until you are happy with the overall color of the soup (stir frequently to keep the rust suspended). There are some commercial products on the market that work the same but when I spent $7 on a small container of one, I decided to try my hand at making my own. There are also some paints that come in rust color that can be thinned down to make this wash but they are not as forgiving as the alcohol based wash in that they are permanent once applied. In the instance of the dozer blade, I would let the rust settle in the alcohol soup for a few moments so I didn’t get a heavily weathered looking blade that is supposed to be in use. If you want a more dilapidated look, keep the rust in suspension so more goes on the model. This dries quickly and some can be brushed away to leave it in crevices and cracks. That is really about it.
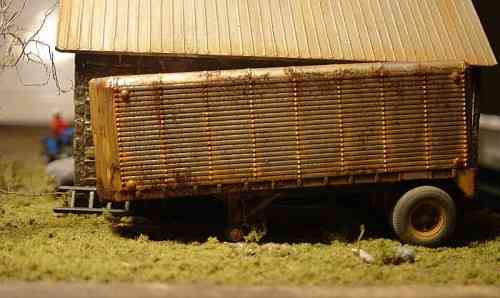
The next phase would be something that has use but only rarely and obviously is in need of work like an old truck bed or the side of a trailer, anything that wouldn’t have a lot of recent wear but rather time exposed to the elements.
Repeat all of the above because this would be the starting point for any weathered metal you want to go further in the weathering process with. Drips of rust can be achieved by putting a small spot of burnt sienna artist color on where you want it and dragging a wet brush from top to bottom on the model. This should give a pretty realistic looking rust streak like down the side of a trailer or on a tin roof.
To give a really rusted look, I brush a little flat acrylic clear exactly where I want the rusting to be and sprinkle the rust on. When the clear coat is dry simply blow away the excess powder and it will have stuck to where you applied the acrylic.
This gives a great textured look to the rust and is especially effective around wheel wells, running boards and door panels.
I really like the use of real rust for a weathering powder but the use of pastel chalks can give the same results. (brown and red with a hint of yellow for pastel colors) For anything (not just metal surfaces) I take a mixture of rust and a little white pastel chalk for a coffee with cream color and give it a dusting. This works great on tires, undercarriages, wheel wells etc. The chalks and powders are the last step in any weathering, and they can be mixed with alcohol or water to make a wash or merely dusted on with a brush. I use an old brush from my wife’s compact (a blush brush you might say). It should be remembered that they are not permanent unless clear coated and may be rubbed off with excessive handling. I have never done so but it has been said that clear coating over powders changes the color to some degree.
In the instance of a boiler or cooker or anything with exposure to high heat, I put a wash of an acrylic black on after I’ve done the dry brushing with silver. I like Polyscale
'oily black' for this since it has some metallic flakes in it. Then hit with the rust powders only to give that night rust look I was talking about.

For constructive criticism or additions Chester can be contacted through the 87thScale.info messageboard !